Flavorful Chicken Taco Salad

Flavorful Chicken Taco Salad is a quick and easy meal for a busy weeknight.  I stumbled over this recipe on Pinterest a few years ago and the pin didn't have any information. It was easy to figure out the plan of creating just by looking at the picture.   Since my family loves Mexican cuisine, I knew this would be a hit with them.
Flavorful Chicken Taco Salad

Flavorful Chicken Taco Salad

One really big time saving thing for this salad is you can cook your chicken ahead of time. I used my pressure cooker and cooked all of the chicken I would need for the week on Sunday afternoon. Then I divided up the meat in containers for each day.  When I made this on Tuesday, it took all of 15 minutes to have it ready for the table. It was that quick!

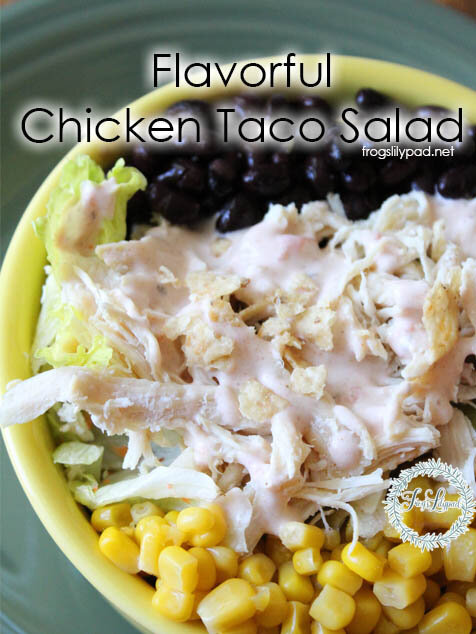
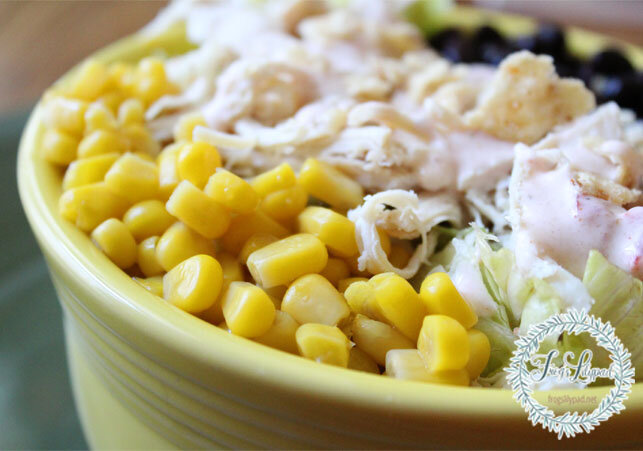
I served the chicken cold in our salad, but you could serve it warm. Also, I heated the black beans and corn just to make sure they were not harboring any microscopic bacteria that might have been in the cans. Once they boiled for a minute or two, I drained and rinsed them in cold water. But again, if you choose, you can serve them warm along with the chicken.

For the dressing, I searched for a Taco Ranch Dressing and found many. I knew I would be able to mix my own dressing by either making it all homemade or using up the bottle of ranch dressing that was tucked away in the refrigerator door. ~ That is exactly what I did.


Since I first shared this recipe back in 2013, I've tried cooking the chicken differently - grilled, boiled, and pressure cooked. The grilled gives it a much better taste because of the char. Boiling the chicken needs a little flavoring to help it out. Pressure cooking does give the chicken a more flavorful taste over the boiling. Maybe because the juice is the actual stock from the chicken with no water added. Either way you choose to cook your chicken, you won't be disappointed with the salad outcome.

Just a tip to consider, add a little taco seasoning to the water if you boil the chicken, or instead of water maybe use chicken broth.

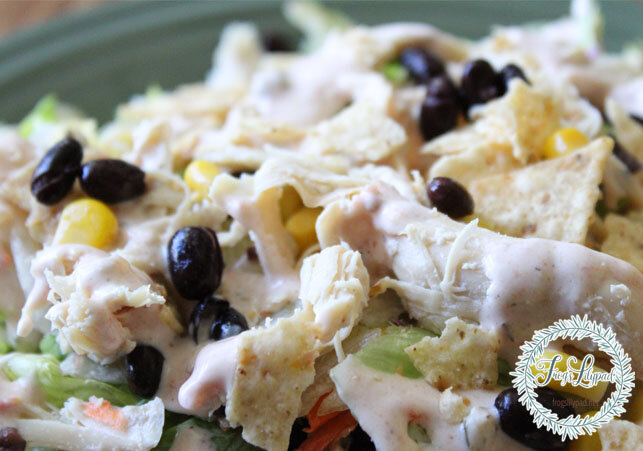
I know what you are thinking, the recipe calls for tomatoes, where’s the tomatoes in the picture?  I'm not a tomato person and the plate shown was mine and not my husband's.  Yes, I prepare and eat supper with the camera.

Flavorful Chicken Salad


Ingredients:
  • 2 cups shredded cooked chicken
  • 1 head lettuce chopped     (or bag of salad mix)
  • 1 can black beans drained and rinsed
  • 1 can whole kernel corn drained    (or 1 cup of frozen (thawed))
  • 1 small onion diced
  • 1 bell pepper diced
  • 1 tomato diced
  • 1 1/2 cups crushed tortilla chips

Dressing ingredients:
  • 1 cup ranch dressing
  • 1/2 cup salsa
  • 2 Tablespoons Taco Seasoning

Directions:

In a small bowl mix together the dressing ingredients and set aside.

In a large bowl add all the ingredients except for the tortilla chips, mixing well. Right before serving, toss in the the tortilla chips and serve.


Do you enjoy taco salads? What's your favorite type of meat to add to it?

The Pasta With BITE - Rattlesnake Pasta

I know what you are thinking! Rattlesnake?! Let me tell you that if I have to worry about being bitten by a rattlesnake, there is no way on this earth that I would even think about eating one! At least not while I have food in the cabinets. Rattlesnake Pasta is a type of chicken alfredo with bite. A huge bite depending on the type of peppers you use. A not so huge bite, if you are not a hot pepper fan or have little ones eating.

Rattlesnake Pasta: The Pasta with Bite {Chicken Recipe}

Rattlesnake Pasta


I read a friend’s status on Facebook and saw where she was talking about this particular dish at a local restaurant in her area. After hearing about the ingredients, I knew I had to try it. So I tried to come up with my version of this dish.

Over the years of making this yummy dish, I've tried different hot peppers from my dad's plants, canned chilies, jalapenos, and Anaheim peppers. This weekend, I used the Anaheim because I've heard the words heart burden too recently. Anaheim peppers are not quite as hot as the jalapenos and I kind of wish I would have used at least one jalapeno in the mixture. But, it is what it is.

I love recipes like this one because like I said, depending on the type of pepper you use, it can be as hot or as not as you want. :) I'm all for having the whole family enjoy a meal without mom or dad being a short order cook for everyone.

I was not one to cook a different meal for my son when he was little. If the recipe called for extra spiciness I improvised the ingredients and steps in getting the food cooked so he could enjoy it without the added heat. In fact, I have never been a short order cook, so my son was required to eat what was cooked no questions asked.Now, my son loves hot, hot, hot foods along with many others. I think my encouraging (requiring) him to try different things when he was little helped him have a palate for a wide variety of foods. Would you believe he loves sushi? Yep, but I never encouragement him to eat it because it is something I'm not fond of. He learned to love it on his own.

Depending on how big your family is, this recipe will be easy to double or cut down the ingredients.


When you look at the ingredients you will notice bell peppers and hot peppers. The bell peppers alone give the recipe a nice peppery taste without heat, so if you have a little ones eating, leave out the hot peppers and cut back on the Cayenne pepper.

Rattlesnake Pasta


Ingredients:

  • 1 pkg chicken breast seasoned and grilled
  • 2 cloves garlic minced
  • 1 red bell pepper diced
  • ½ green bell pepper diced
  • 1 small onion chopped
  • 3  jalapeno peppers or any hot pepper you like
  • 3-4 cups heavy whipping cream
  • 1 cup Parmesan cheese
  • 3 Tbsp Cayenne pepper
  • 1 box linguine
  • enough water to cook the pasta

Directions:

Season and grill the chicken. When cooled, cook into bite sized pieces and set aside.

Bring a pot of water to boil for the pasta. Add salt and a drizzle of oil, to help keep the noodles from sticking together. Cook pasta according to your taste.

In a large frying pan sauté garlic, onions and peppers over medium heat. Add chilies/peppers. Slowly pour heavy cream into pan and add Parmesan cheese. Stir until melted and smooth. Add Cayenne pepper stir until well mixed.  Add chicken.  Cook until sauce becomes thick. Serve over the pasta.


Do you have a favorite recipe that has a kick or a bite when you eat it? I'd love to hear about your recipe.

My Not So Spring Cleaning Tasks

While we are waiting for the official arrival of spring, now is the time to plan your spring cleaning tasks. While I’m a not a once a year spring cleaning cleaner, I’m sharing the tasks I do once a month in each room.
My Not So Spring Cleaning Tasks
This post contains affiliate links. You can read my Disclosure.

What do I mean I’m not a once a year deep cleaner? I like to keep my spring days open for fun like fishing and antiquing than to be worrying about cleaning. Once a month, I take a room and deep clean it from top to bottom. Most rooms only take one day, but there have been times I cleaned more than two days in a room. With my once a month schedule, clutter and grime have a hard time sticking around.

No matter when you do your spring cleaning or how often, it is best to have plan and stick with it. Don't let the mess overwhelm you, remember the little quote, "Slow and steady wins the race". Depending on your home,work life, and schedule, cleaning every day for a week maybe out of the question. Find a schedule that works for you. What works for me don't always work for others. Test the waters on timing and methods while cleaning as you find what works.

My Not So Spring Cleaning Tasks


Kitchenthe heart of the home. When it is in a disarray our lives can become stressful.

Clear all surfaces. Starting at the top, working your way down clean everything inside and out: cabinets, drawers, and appliances. Don’t forget the walls, crown molding, windows, and baseboards If you are short on counter space, consider removing small appliances that are not used enough. Free up space by bringing out the appliance when ready to use helps in keeping a look of clutter down.

Now’s the time to go through your storage bowls. Missing lids, or bowls with no lids, toss and replace them. Do you have a cabinet full of Great Aunt Eliza’s dishes and milk glass that hasn’t seen the light of day in a good long while? Consider selling or donating it. There’s no reason in keeping a cabinet full of dishes that will never be used.

Don’t forget to clean the pantry. Throw out any out of date or stale foods. Wipe down the cabinets and walls. When you’re ready to put everything back, organize your shelves. It’s much easier to find needed items when you are not searching through a wall of potato chip bags out in front.

If you don't do a weekly cleaning of the refrigerator and freezer, now's the time to deep clean it.

Sweep and mop.


Dining Room / Living-Family Room / Bedrooms -

Clear all surfaces. Remove and launder curtains, bedspreads, pillows. If any mending is needed, now’s the time to take care of it. Wipe down everything, don’t forget the windows. Any drawers piling up with those “I don’t know what to do with it”, go through them and toss any junk. Vacuum/ damp mop dust, and sweep floors.

Go through clothes drawers and closets. Donate out grown, or no longer worn clothes and shoes.

Ceiling fans can be cleaned by using a pillowcase. Place a blade inside the case and wipe good. The pillow case will catch all the dust build up. Take the pillowcase outdoors to shake out the dust.

Clean the walls, and vacuum/sweep yourself out of the rooms.

Bathrooms -

Take down curtains, shower curtains, guest towels and washcloths and launder them. If your plastic shower curtain liner is in good condition and only needs cleaning, pop it in the washer with the other items and clean it. Be sure to hang it up to dry.

Throw away any old soap scraps, shampoo bottles, out dated makeup and toothpaste.

Get rid of any raggedy towels and washcloths. In fact, you can turn these into house cleaning rags to use and then toss. Go through your cleaning supplies and toss out the old, don’t forget about your toilet brush, replace it if needed.

When cleaning the bathroom, start with the mirror and sink, move on to the shower/tub and then finish up with the toilet before sweeping and mopping the floor.


Laundry Room-

Clear off all the surfaces. Wash down walls and windows. Now’s a good time to clean the inside of your washer according to the manufacturer instructions. While most know to clean out the vent on the inside of the dryer, don’t forget about the vent hose that leads outside your house. When that hose is not kept clean it makes your dryer work even harder at drying clothes. It’s also a fire hazard if you’re not careful.

You’ll need a strong arm and back to help you move the washer and dryer out so you can clean behind and underneath them. It’s amazing what can be found hidden behind them when we go looking.

If your laundry room also acts as a storage room, don’t forget to go through the stored items and clear out any clutter.

Dollar Tree has all your cleaning needs. And they're only a dollar, you can't beat that!

Porch / Patio / Deck -

Make this area look inviting even if it is not warm enough to enjoy yet. Sweep away any dust and cobwebs and wipe down the light fixtures. Check the doormat, does it still look nice or does it need replacing? If it’s warm enough, set out some plants. If not, look into artificial plants and flowers to bring about that touch of spring. Depending on how late your threat for winter weather is you can set out your patio furniture or cushions to offer that homey feeling.

Have you missed any of my posts about cleaning? You can catch up HERE.

What does your spring cleaning list look like?

Immune Boosting, Cold and Flu Fighting Homemade Elderberry Syrup Recipe

Not too long ago, my family was exposed to the flu. Last week my son was down for the count the whole week while my husband took one sick day from work. And all I could do was remember how I felt last year with the flu and how it seemed to never end. Being determined, I raced to the store to grab some elderberry syrup because I was not catching it. If I did, I was going to do what I could to lessen the symptoms and the duration of the dreaded illness.

Homemade Elderberry Syrup

Homemade Elderberry Syrup

Elderberry syrup is not something new for our family. We’ve been taking it for years, but I was out and had an order for dried black elderberries in the mail when the sickness hit our home. Making a batch of homemade elderberry syrup was already on my to do list because the store-bought brand tastes horrible to me because of the glucose syrup (corn syrup). But, I had to put aside my tastes so I could reap the benefits of the precious little black berries.

I am living proof, elderberry syrup works! After two teaspoons of the syrup, the scratchy feeling in my throat went away. For the next several days, I took upwards of 10 teaspoons each day and never had a symptom to rear its ugly head. My stubborn son refused his momma’s magical syrup and my husband gladly took it after spending most of the sick day in bed.

Elderberries are an actual food; they are used in jellies, jams, pies, and even wine. A yummy food with healthy benefits. Elderberry has a long history of being used in traditional medicine. Only the flowers and berries can be used, but the berries must be ripe and cooked if ingesting them. Unripe berries can be green or red depending on the variety. If you pick wild elderberry, BE SURE you know how to identify them.

There can be drug interactions when taking Elderberry with prescription medicines. Pregnant and nursing women are warned against taking them.

There should be no ill side effects when you properly take Elderberry. Although, it has been known to cause tummy problems when too much is ingested. Nothing too serious, you just won't want to leave the house. :)

I’ve not read anywhere about the length of time on taking Elderberry. Because of this, we only take it when we need to combat a cold or flu.  We also take it a couple of days before we know we are going to be in a large group of people for a long period of time.

Just a thought about honey. Children under a year old should not ingest honey. While you can certainly leave out the honey, the berries are so tart – almost bitter, a sweetener is needed. Look at using cane sugar as a sweetener.

Just a thought about elderberries. The seeds are bitter. If you mash the berries too much, you’ll give off the bitterness from the seeds.

Elderberry Syrup

Ingredients:
  • 1 cup dried elderberries
  • 3 cups water
  • 1 cup honey (cane sugar)

Directions:

In a medium pot, bring water and berries to a boil. Turn down and simmer for about 45 minutes or until the liquid has reduced by half. Strain the juice into a glass container (I use my large measuring cup). Little press on the berries with the back of a spoon, being careful not to crush the seeds. Allow the juice to cool. Add the honey and stir until mixed well. Store in a jar in the refrigerator.

Dosage:
Adult - 1 Tablespoon up to 4 times a day.
Child – ½ – 1 teaspoons up to 3 times a day.


Do you take elderberry syrup or another traditional medicine to combat a cold or the flu?


Disclaimer: I am NOT a healthcare provider. I am simply a wife and mom who is sharing what she has learned from research and a trial and error routine of finding healthy foods and all natural methods  for my family to enjoy.

With Jesus, Whom Shall I Fear?

I joined in the Bible memory verse challenge Through the Word with the Christian Ladies Network this month. Of all the verses in the Bible that could have been chosen, Psalm 27:1 is one that sits very close to my heart. A verse I memorized several years ago and I still cling to in those moments of fear and concern. With Jesus, whom shall I fear?

With Jesus, Whom Shall I Fear?

With Jesus, Whom Shall I Fear?


I’m not one to run to others sharing things in my life. I’m a quiet person who tries to deal with things without the world watching and whispering. For me, this works. While there are others who I could talk to about a matter, there is only One I can completely trust with it. He knows exactly what I’m going through and how I feel about it. He is the One in control of the world. He is the One in control of my life and the things that enter and leave it. He is the One who can give complete peace when I fear.

In the past, I shared How Can I Fear With Jesus. Anytime I begin to feel a sense of fear, I have to remember I have Jesus with me. He is in total control of every situation I face, good or bad. Just remembering He is there doesn’t always help, but having the FAITH He is there is something that helps me when times get dark.

Keeping our faith in Jesus plays a big part in battling fearful things. Growing a deeper, stronger faith in Him builds that wall of security we can feel because of who Jesus is and what He can do in our lives.
With Jesus in our lives, whom shall we fear?

The LORD is my light and my salvation;
whom shall I fear?
the LORD is the strength of my life;
of whom shall I be afraid? Psalm 27:1


You can learn more about Through The Word  at the Christian Ladies Network.

Evolution and Two Reasons Why I'm Teaching It

Evolution is a word that brings a wide range of emotions in people. For many, fingers crammed into the ears and the refusal to discuss it is an act of behavior because they believe in the Biblical account of creation. Nothing more, nothing less. Then there are those, who believe in evolution and are well versed on the matter. They become loud and boisterous to those who have their fingers crammed in their ears refusing to listen. Name calling and finger pointing comes from both sides of the firing line.

Breaking Out of the Bubble and Teaching Evolution as a Christian Homeschooling Family.

Ignorance is shown from one side while intolerance is shown from the other. For our school at home, I’m teaching evolution. Before you think I've lost my mind, please continue reading; you'll see I haven't.

Evolution:

Two types of evolution we need to talk about


MACROEVOLUTION - evolution  that results in relatively large and complex changes (as in species formation)

An example of Macroevolution would be a fish changing into a monkey and then changing into a human.

MICROEVOLTUTION - comparatively minor evolutionary change involving the accumulation of variations in populations usually below the species level

In other words – adaption. An example of Microevolution would be different breeds of dogs. While the breed may differ, the species does not. Another example would be house sparrows. The birds were introduced to North America in the 1850’s. They evolved different characteristics in their bodies to adapt to the different locations. Larger bodies for colder climates – smaller bodies for warmer/hot climates.

Evolutionists lump these two together. When we disagree with them on evolution, we are disagreeing with microevolution.

During the three months my son attended public school in the third grade, he was introduced to macroevolution. He was quickly reprimanded by the teacher for speaking of it being false when asked. While I did not really focus on teaching evolution too much before that, I knew that would change. This momma was proud of her son for picking up on this teaching even though I never really discussed it with him. I was even more proud of him for taking a stand when asked what he believed. After all these years, I’m still scratching my head in wonder about reprimanding a child’s honest answer when he was asked about his belief in the first place.

The first time I mentioned teaching evolution to my son with someone, I was asked if I was concerned with him changing the way he believes. My answer was very simple, no. I don’t have the fear of him changing the way he believes because we find answers by reputable Christian scientists or organizations that have written articles on a specific area we are researching. We’ve also taught our son the Bible and the in and out of our beliefs.


Two Reasons Why I Teach Evolution


1. Exposure - I’m teaching about evolution because I want my son to be familiar with the subject. Just this school year, he was exposed to a huge amount of Big Bang Theory teaching because of his astronomy course. We’ve discussed it in the past and he was familiar with some of the aspects of it when he was studying.

At first, I was a little leery of him learning so much and even advised him to skip over it. But he mentioned he felt he needed to learn it so he would know more about it and be able to pick apart what is not scriptural in the teachings.

 I like a kid who is willing to learn so he will be more educated on a subject.

If I keep him in a bubble where he does not hear about evolution, he will not know how to respond to it when he attends college, if he chooses to go.

2. Wisdom – I do not want my son to look like an ignorant person when he tries to defend his beliefs. Microevolution is real. When he is defending what he believes, he’ll know which type he’s standing for and the type he is arguing against.

I remember growing up in church and the Christian school and evolution as a whole was taught to be false.  This has to stop! Churches and Christian schools need to bring in creationist who know the facts between the two and teach the differences. When we refuse to listen to the fact of microevolution, we are labeled ignorant.

As a home educating family, we are teaching in a way for our son to have a well rounded education and that means including evolution in our studies.

I am not promoting evolution for independent learning children. Parents NEED TO KNOW what their children are reading, watching, and studying.  Be proactive on a subject such as evolution.

Websites I recommend to aid in teaching on the subject:

Answers in Genesis       Creation Ministries International       Creation Moments

Biology 4 Kids        NASA SpacePlace       Khan Academy       Youtube 

Breaking Out of the Bubble and Teaching Evolution as a Christian Homeschooling Family.

Homemade Peanut Butter Ice Cream

Anytime is the right time for ICE CREAM! I love ice cream but I don’t like all the added ingredients I can’t pronounce in the store-bought brands. Being able to read a list of ingredients and know what they are is nice and homemade ice cream is just that. Customizing the amount of each ingredient for your needs is another awesome thing about homemade ice cream. Our family has their favorite flavors and Peanut Butter Ice Cream is one of them.

Homemade Peanut Butter Ice Cream

This post contains affiliate links.
Peanut Butter Ice Cream
The first time I tried making peanut butter ice cream, I followed the recipe in the book that came with my ice cream maker. It was good, but it didn’t have the little bites of peanut butter I was wanting. The next time, I used the base recipe I use for vanilla and chocolate ice creams. I didn’t mix up the peanut butter as much and the peanut butter cups I added was beaten down into small specks because I added them at the beginning. Still not what I was looking for.

I finally decided to hand mix everything before pouring it into the ice cream maker’s bowl. When I did this, I ended up with what I was wanting. Little bites of peanut butter in each spoonful, it was perfect!

Making homemade Peanut Butter Ice Cream is easy. In fact, you probably have everything in your pantry and refrigerator right now. Peanut butter, sugar, milk, and heavy cream is really all you need. Vanilla does give it a nice flavor and the peanut butter cups gives it a nice little surprise with every bite.


Just a thought about vanilla. If you use pure vanilla wait until after the mixture has frozen before adding it. The alcohol works against it and makes it a little harder to freeze. When you pour it in, let the machine keep mixing for about a minute or two. I can’t say what will happen if you use imitation vanilla because I only use my own homemade vanilla.

Just a thought about the peanut butter cups. If you want little chunks in each scoop, wait until the end to add them.

Just a thought about the ice cream mixture. While the book to my maker doesn’t tell you to chill the liquid back down after mixing everything together, my mom’s does. I tried it to see if there was a difference and the only thing I found was that the ice cream was a little harder than soft serve.

I LOVE my Cuisinart Ice Cream Maker!


Peanut Butter Ice Cream


Ingredients:
  • 1 cup peanut butter (not natural)
  • 2/3 cup sugar
  • 1 cup milk
  • 1 ½ heavy cup cream
  • 1 teaspoon pure vanilla extract
  • 1 cup chopped peanut butter cups (optional)

Directions:
In a medium mixing bowl, mix peanut butter and sugar by hand until smooth. Add the milk and continue mixing until the sugar has dissolved and peanut butter has broken into little pieces. Stir in the cream. Cover and chill for up to 30 minutes in the freezer.

**Follow the directions for using your ice cream maker.**

When ready to make your ice cream, stir the mixture a little before pouring it into the maker bowl. Turn on the ice cream maker and pour the liquid into the bowl. Let mix until thickened about 15-20 minutes depending on your maker. This mixture will be a soft serve consistency, if you’re wanting a hard ice cream, pour the mixture into an airtight container and place in the freezer for about 2 hours. When ready to serve, remove from freezer 5-10 minutes before serving.


DIY Knitting Needles WITHOUT Power Tools

Last year, my husband made me a set of knitting needles. I was amazed at the cost of large plastic needles when I prepared to make an afghan. We were still living in the middle of nowhere Montana, and the local Walmart didn’t carry the size I wanted. And I was too far away for a quick drive to the nearest yarn store. After comparing prices, I knew I was not paying $20-25 for plastic needles. My only option was to make them. So that is what I did!
DIY Knitting Needles WITHOUT Power Tools

DIY KNITTING NEEDLES


**Before I even began with what I bought and how I made them, I need to make this announcement. I would never do this for smaller needles for clothing. The least little difference causes problems with the finished item not being the correct size.

Another service announcement: You can make these with power tools much quicker, but if you don't have access to tools like a belt/hand sander, give this a try. This method takes time. - Just a warning for you.

Needed items: hand saw (we used a coping saw), dowel rod, sandpaper (80,150,220,and 400 grit), something to put on the end of the needles (large buttons), and spray clear coat (optional).

For the first pair of needles, I bought a ¾ inch dowel rod because it was the closest to a size 50 needle without being to hard too work with. I already had the sandpaper, the buttons, the hot glue, and the clear coat spray. So, I only spent $3.00 on them.

DETERMINE THE LENGTH. On the first pair, I measured the rod at 13 inches. I wish I would have cut them longer because I had to squish the yarn on the needles while knitting the last little bit of stitches. It’s better for the needles to be a little too long than not long enough and risk the end piece coming off along with all your stitches.  I worked on a new pair of needles for a different size afghan, so I had them cut to  18 inches. If I remember, the rod in the picture is  ½ inch.


Cut the rod to desired length.


Sand down the rough ends using the 80 grit paper.


The next step, form the point. My husband held the rod at an angle to start the formation.


Once the point is formed, you can do two things. You can cut/whittle down the point to save time, or use the 80 grit sandpaper and sand the point down. Whittling keeps your hand from cramping, but if you are not comfortable with “shaving” down the wood, then using the sandpaper is the best way to go. (Just remember, it will take time.)

When you have your point made, switch to the 150 grit sand paper and smooth it and  the needle. Change to the 220 grit paper and sand. For the finishing smoothness, switch to the 400 grit.

If you choose to use a spray clear coat, now is the time to use it. Be sure to let each coat thoroughly dry before adding another. The first set of needles I used it, but the second set, I did not. So far, I haven’t had any problems with them.

Attach whatever you are using as the end stop of the needle.


Now, put them to use and knit something beautiful.

Don’t waste your time searching for large needles. Don’t waste $20 or more for a pair to only knit large projects.

Save Your Money, Make Your Own, and Work a Little Effort into a Pair – You’ll be glad you did!

Have you made your own knitting needles or something else similar to keep from spending a bunch of money?